
[Acoustic Guitar Chords] > How to Play the B7 Chord on Guitar (Technique, Variations and Exercises)
Learning the essential chords as a new guitar player can be a very rewarding experience. With each new chord, you’re adding another tool to your guitar-playing toolkit, learning how to transition between them, and getting that much closer to guitar mastery!
Today we continue on the chord-learning journey with a new chord.
The B7 chord, also known as the B dominant 7th, consists of the notes B, D#, F#, and A. It’s very similar to the B chord but with an additional seventh note.
It has a distinctive and melodic sound. If you intend to dabble in country, folk, or blues music, this one’s for you!
In this guide, I’ll help you discover what exactly the B7 chord is, the different variations you can play, the correct finger positioning to pull it off, and easy exercises that you can practice.
Ready? Let’s get started!
- How to Play the B7 Chord on the Guitar
- B7 (B Dom) Chord Variations
- B7 Chord Finger Positioning Tips
- B7 Chord Exercises
Originally published on the 1st of November, 2022, this post was republished on March 01, 2024.
Transform Your Guitar Playing
In 10 Minutes a Day
Remember, the secret to a fulfilling guitar journey is consistency, not laborious practice.
Snag your FREE TAC Progress Tracker today and build the skills to learn songs faster in just 10 minutes a day!
Yes, I Want the FREE Download!How to Play the B7 Chord on the Guitar

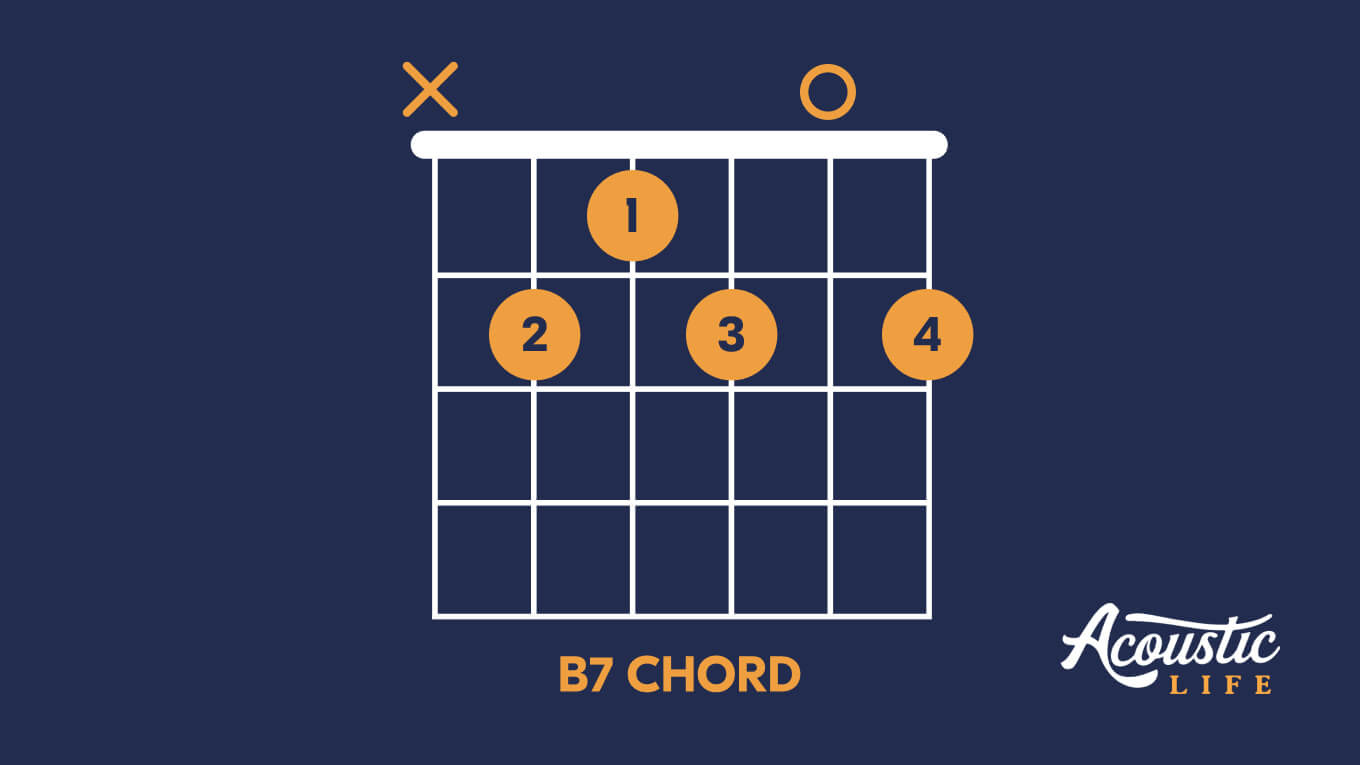
Let’s take a look at exactly how to play the B7 chord on guitar. I’ve included a chord diagram above that you can use to see exactly how your fingers should be placed, but you can also use the following instructions to guide you.
Here’s how to position your fingers for the B7 chord:
- Index finger on the 1st fret of the D string
- Middle finger on the 2nd fret of the A string
- Ring finger on the 2nd fret of the G string
- Pinky finger on the 2nd fret of the high E string
- Play all strings except the low E string
You can see the B7 chord being played in this video by Andy Guitar. Notice how bright and vibrant it sounds when played correctly!
B7 (B Dom) Chord Variations
As with all guitar chords, there are multiple ways to play the B7 chord. It might seem like there are too many options, but actually, this works in your favor!
The more variations there are, the more likely you are to find one that suits your style of playing and your strengths – be it a strong pinky finger or a wide finger span.
Open B7 chord – 3 Finger Variation
If you found the above version a bit challenging, let’s take a step back.
This open B7 chord only requires three fingers, instead of four. Although it’s not considered the official B7 chord because it lacks a note, it is a great place to start for beginner players.

Using the diagram above, here’s how to position your fingers:
- Index finger on the 1st fret of the D string
- Middle finger on the 2nd fret of the A string
- Ring finger on the 2nd fret of the G string
Once your fingers are set firmly in place, play the three middle strings and omit both the high and low E strings.
Better, right? Now as you’ve probably already guessed, this version is a great way to slowly build to the classic open B7 chord. Strengthen that pinky finger and you’ll be there in no time.
B7 Chord – Barre Variation
Next is a slightly more advanced version, the barre chord variation.
Barre chords are sometimes difficult to grasp for beginners. They tend to be more demanding on the index finger as you have to hold down multiple strings on a single fret. But as always, with a bit of practice, you’ll get used to the positioning in no time.

Here’s how to play B7 chord barre variation:
- Place your index finger on the 2nd fret of the A string and barre all strings except the low E string.
- Place your ring finger on the 4th fret of the D string.
- Place your pinky finger on the 4th fret of the B string.
Once all your fingers are in place, strum all strings except the low E string.
Feels a bit weird, right? But trust me, the more you attempt these unusual shapes, the more natural it will start to feel.
Two-Finger B7 Chord Variation
If you’re looking for a slightly different version of the B7 chord, I give you the two-finger variation. As you might expect, this version only requires two fingers – your index and ring – to play.
With the higher-pitched notes of this variation, you can use this in a funk tune, or simply to add a funky sound to whatever song you’re playing.

To play this two-finger variation, place your:
- Index finger on the 4th fret of the D string and barre the D, G, and B strings.
- Ring finger on the 5th fret of the high E string.
B7 Chord Finger Positioning Tips
Before we get into the variations, an important thing to note is your finger positioning. This is what will set you up for success and help you know exactly where and how to place your fingers when forming the chord.
Here are a couple of things to note:
- Precision. Ensure your fingers are in the right position and pressed firmly down. If not, you run the risk of a muted note or fret buzz.
- Arch your fingers. Make sure you have an arch in your finger joints. This ensures a clean and crisp sound and avoids accidentally touching any other strings.
- A strong thumb: While all your fingers are doing lots of the work, your thumb shouldn’t be completely idle! Gently press it into the back of the guitar neck for added stability.
B7 Chord Exercises
Practice, so the saying goes, makes perfect. So let’s get down to some practice.
For specifically practicing the B7 chord, it’s best to drill the above three variations over and over. This way you’ll strengthen your fingers and ensure that each position is executed precisely.
One of my favorite exercises for learning new guitar chords is also the simplest:
- Using your fretting hand, form a B7 chord
- Strum down four times
- Release the chord
- Strum the open strings four more times
- Rinse and repeat
Aside from this exercise, I often recommend practicing switching between chords quickly to get a feel for the way they transition between one another.
Once you’ve made your way through a few of the chord guides, you’ll know quite a few chords that you can switch between.
Songs That Use the B7 Chord
If you’re wondering where you can hear the B7 chord in the wild, you don’t have to look very far – it’s used widely in some of the most popular songs ever written! Here are a few of them:
- “Hotel California” by Eagles – This classic rock song features a variety of chords, including B7.
- “Before You Accuse Me” by Eric Clapton – A blues track that uses the B7 chord, and showcases Clapton’s impressive guitar skills.
- “That’s Alright (Mama)” by Elvis Presley – One of the King’s early rock and roll songs that uses the B7 chord in its progression.
- “Blackbird” by The Beatles – While not centered around the B7 chord, it does make an appearance in this iconic song’s complex guitar arrangement.
- “Creep” by Radiohead – This alternative rock hit uses a variety of chords, including B7, to create its unique and ethereal sound.
B7 Chord, Check! What’s Next?
Now that you’re more familiar with the B7 chord, you might want to turn your attention to something a bit more challenging.
If you want to take your guitar routine to the next level with consistent, fun exercises and a whole bunch of video lessons, I recommend checking out my online guitar workshop – Tony’s Acoustic Challenge.
It uses this weird, kinda backwards method that I pioneered that I guarantee will take you from guitar dabbler to guitar hero FAST, enjoying every lesson along the way.
Watch this FREE guitar class for three secrets to learn guitar faster in just 10 minutes a day.


